Jen is having a make-over open house. Check out her blogfor a list of participating do-it-your-selfers, and join in yourself if you have a re-do you'd like to show.
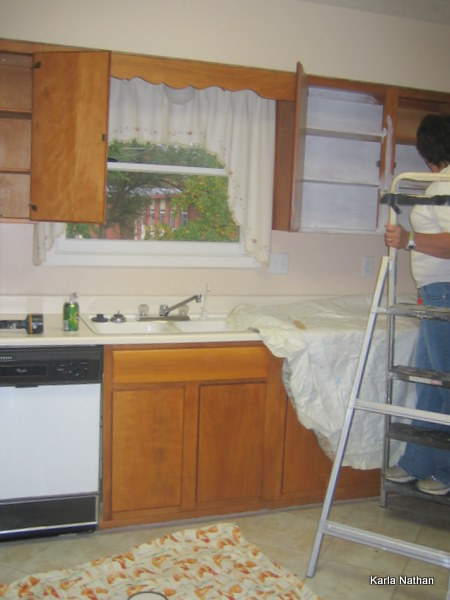
I pulled out some photos of a redo I did a little while back for my sister-in-law, to show the Magic Of Paint. They bought an older home and didn't have anything left in the budget for remodeling, so we did what we could with paint, most of it from the surplus store where paint is only 5 bucks a gallon. The primer is the one thing I insisted that they get a specific brand, not just what was available at the surplus store.
I always look for BONDING primer. Make sure the label says, "will adhere to shiny surfaces". If you do that, and the wood is clean, you don't have to sand. Water based bonding primer (Gripper from Glidden is my current fave) is all the prep you'll need.
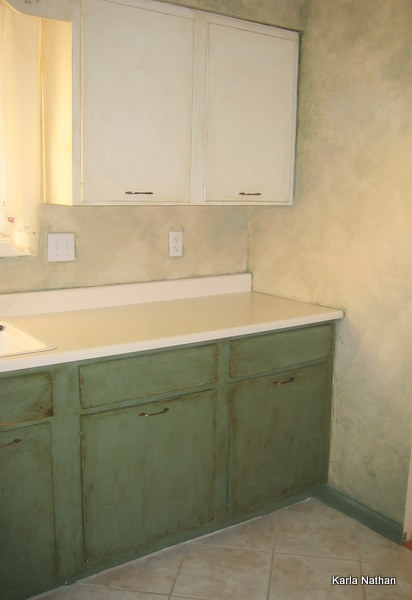
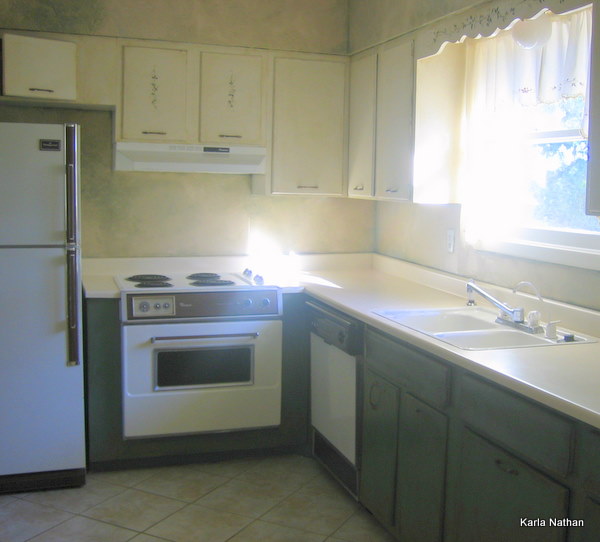
We primed and painted the top cabinets and all the interiors ivory and the bottoms and all the trim in the room a deep sage green. Then, we beat the cabinet fronts with tools, for dents and dings, to "distress" them.
After the paint was dry, we mixed Min wax poly/stain combo (in walnut) with a bit of turpentine to thin it, and brushed it on in small areas, then wiped it off (with cut up old tee shirts), for an aging effect.
Oh, and I added some little vines in green on a few of the top doors before the stain-
The walls were already white, so I used the ivory and green to do a faux finish on the walls of the room. The entire project, walls too, took 3 of us most of one day to do.
Leaving the cabinet doors on and painting right over the hinges makes the job a bit faster and unless you have drop dead gorgeous hardware, why not? We did remove the handles and reuse those because they weren't bad.
I think the total cost was about $15 for primer, $10 for paint, and $8 for the stain/poly mix to go over the top.
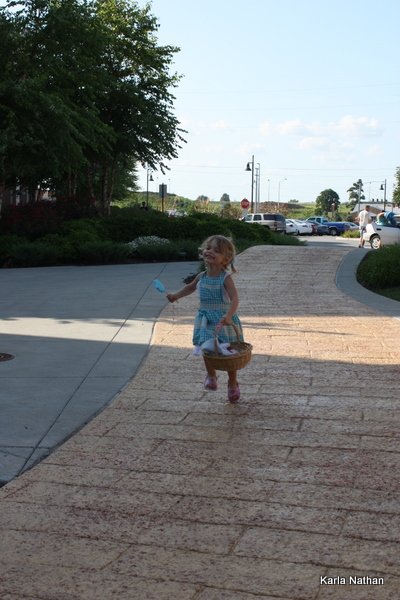
And here is a make over of another kind. This photo of Sugarwings on the Yellow Brick road was edited with Picassa. I lightened, brightened, and retouched it, then deepened the colors with saturation.
I wanted to make the picture look more like Oz than Kansas.
This is how it started out.
(its a picture I took right before the other one, not the same one, but the same conditions). Picassa is easy to use and this only took about 10 minutes to do. I'm not real good with the retouch button yet, but I'm figuring it out.
Now, I need to go and see some of the other redos that Jen has links to on her blog. I love before and afters!


Hi Karla! The kitchen turned out beautiful! What a fantastic transformation…isn’t amazing what we can do with paint and a little elbow grease? Thank you for visiting!
That looks great! We love our paint, don’t we? I’m going to try your Minwax trick on my dining chairs – thanks for the tip!
Andrea
The Sugarwings Picassa pic is adorable. You are soooo talented!
I wish I could sew and I wish I knew how to better use my computer.
Someday!
Thanks for the hint about binding primer. We are painting my daughter’s room now.
Suz
Wow! What a difference paint can make!
Karla, I love it! You would NEVER know that they were the same cabinets! What a huge difference! I really want to paint mine now! Jen
Thanks, Karla! This kitchen remodel is so inspiring, especially the tip about the primer. I’ve been holding off painting our cabinets, because, well, I don’t want to sand … ever.
Was Sugar Wings chanting “follow the yellow brick road”? I bet she was. She is so cute.
Beautiful makeover of the kitchen and a magical makeover of the photo. It truly does look like something from fairyland – or Oz.
Lorrie
I like both the makeovers. Cute little subject on the second one though. I don’t think there could be a bad pic of her!
you know how to do everything – that kitchen looks great & you gave great tips on how to do it
Wow! What a difference Picasa makes! I’m almost afraid to try it, as I have enough obsessions and little enough time as it is. I can just picture the hours and hours playing with it!
Love your studio, every time I see it, it seems to get prettier. Sugarwings looks beautiful all the time. Martha
Karla,
Thank you, so much, for visiting my blog. I think I barely met you at Silver Bella last year, but I didn’t realize it was you until later that night. I look forward to seeing you again.
Wendy
I want to redo my kitchen cabinets and you’ve given me something to look forward too!
Blessings,
Christine
But you are an expert at this and you do things . . . . paint things just perfectly. I haven’t really tried my hands on it but somehow I enjoy reading about paints and primers and what you do with it LOL Maybe cause I like the before and after look in the end. First, Sugarwings bed and others and now an kitchen. This is major!. And what a difference it is. I like the aged look you did and the swirl details too! 🙂
Look at Sugarwings so happy walking through the yellow brick road – – – going to Emerald City? 🙂
Li
(I’ve seen you studio in your post before. Was that last month . . . or maybe more?. There’s so much to look at. It’s definitely a happy place for crafting.)
Karla, that is one amazing and wonderful kitchen makeover…it doesn’t even look like the same place after you worked your painting magic…WOW!!! i am SO impressed!!!
i love the picture of Sugarwings traveling down the yellow brick road…darling!!!
That Oz photo looks fabulous! You did a great job with it!
Hi this is my first comment, but I just had to comment on how fabulous the kitchen redo looks. I really like the two tone cabinets with the light on top and dark on the bottom. It’s amazing what a change paint makes!
Karla,
You talents never cease to amaze me, the redo is fantastic and so cost effective! We don’t have one of those paint surplus places but I have lucked out a time or two with oops paint at the hardware store.
Thank you for visiting and viewing my studio. Have a great week!
Great job using Picasa! I’ve been using it for months and months but you’ve been playing around with it far more than I have!
Karla, That redo is amazing…I love it… Paint always does wonders…Love seeing little Dorthy..
Stephenie
Karla –love the cabinets!! WOW!
love, kelee
Great ktchen makeover.
Of course Little Dorothy is just way too cute
Alison
I have a project that’s not even that major and I can’t seem to make myself do it. You amaze me.